Sunday, February 20, 2011
3D Small Engine Carburetor by Axel Keck
This carb was reverse engineered in 2004 as part of the engine project posted below. Good work Axel!


3D Engine Assembly, 2004
For this project, students were each given different parts to reverse engineer. They took precise measurements with micrometers, vernier calipers, thread pitch gages, depth gages, fillet/radius gages, and a variety of other measuring tools, then created 3D models with AutoCAD. It was a complicated and technical challenge, and the kids handled it very well. Many more parts were modeled, including all of the fasteners, but bringing all of them into this file exceeds the limits of our computers.
The reverse engineering of actual parts is a challenging hands-on/minds-on experience and students get a lot of development out of it. Good work CAD class of 2004! Shown below are 3D exploded assembly views.


The reverse engineering of actual parts is a challenging hands-on/minds-on experience and students get a lot of development out of it. Good work CAD class of 2004! Shown below are 3D exploded assembly views.


Friday, February 18, 2011
Brick Veneer and Sill Construction Detail by Nate Strehler
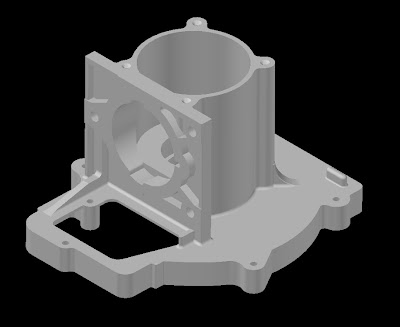
Engine Housing by Stephen Arndt
This engine housing from a string trimmer was reversed engineered in 2010. In this process, students use micrometers, vernier calipers, and a variety of other measuring tools to measure an actual part, then create drawings or 3D models. It is an excellent hands-on, minds-on experience. Good work, Stephen!


Cheeseburgers and Fries by Jacob Box, Lerin Studt, and Josh Helsel
Tuesday, February 15, 2011
Business - Soda Design
In class we had to come up with a logo for our own design business associated with the TAFE. We discussed alot on what the final product would look like and went through many possible names that it could be.
Unfortunately we came across a few hurdles as not everyone in the class agreed as to what the final logo and name would look like.
We start off with the concept of Raw Design, but finally came to the conclusion that it is just too hard of a concept and it wasn't really what we wanted people to perceive us as.
So we went back to the drawing board and came up with a totally left field name "Soda". We went away and to come up with logos and this is what I have produced....
Eventually we decided that chris's logo would be our final logo.
Subscribe to:
Comments (Atom)


